Thursday, February 28, 2013

How to Install .deb File on iDevices (Cydia ထဲက .Deb File ေတြကို ဘယ္လိုသြင္းၾကမလဲ)

နည္းလမ္း (၁): AutoInstallation

  1. Windows/Mac အတြက္ iFunbox ကို Down ပါ (iFunbox Down ရန္),
  2. မိမိသြင္းလိုတဲ့ (.deb) file ေတြကို desktop ေပၚကို Down လိုက္ပါ
  3. iFunbox ကို Run ျပီး iDevice (iPhone, iPod or iPad) ကို ခ်ိတ္လိုက္ပါ
  4. iFunBox က မိမိ device ထဲက contents ေတြကိုျပပါလိမ့္မယ္၊  var/root/Media/ ဆိုတဲ့ လမ္းေၾကာင္းကိုေရြးလိုက္ပါ။
  5. Cydia/AutoInstall ဆိုတဲ့ folder ကိုေဆာက္လိုက္ပါ၊ ဒီလိုျဖစ္သြားပါလိမ့္မယ္ var/root/Media/Cydia/AutoInstall (အစထည္းကမရွိမွာသာ Folder ေဆာက္ရန္ျဖစ္ပါတယ္)
  6. Desktop ေပၚမွာ Down ထားတဲ့ (.deb) file ကို  var/root/Media/Cydia/AutoInstall ဆိုတဲ့ Folder ထဲကိုေရႊ႕လိုက္ပါ
  7. iDevice ကို Reboot လုပ္လိုက္ပါ။
  8. YOU ARE DONE

နည္းလမ္း (၂) : iFile မွတဆင့္သြင္းနည္း

လိုအပ္ေသာ Software : iFile ( Insanelyi or HackYouriPhone repo ေတြကေန Down နိုင္ပါတယ္)
  1. Windows/Mac အတြက္ iFunbox ကို Down ပါ (iFunbox Down ရန္),
  2. မိမိသြင္းလိုတဲ့ (.deb) file ေတြကို desktop ေပၚကို Down လိုက္ပါ
  3. iFunbox ကို Run ျပီး iDevice (iPhone, iPod or iPad) ကို ခ်ိတ္လိုက္ပါ
  4. iFunBox က မိမိ device ထဲက contents ေတြကိုျပပါလိမ့္မယ္၊ ၾကိဳက္တဲ့ လမ္းေၾကာင္းကတဆင့္ Folder တစ္ခုကိုေရြးလိုက္ပါ။  ဥပမာ:  var/mobile/Documents
  5. Desktop ေပၚမွာ Down ထားတဲ့ (.deb) file ကို var/mobile/Documents ဆိုတဲ့ Folder ထဲကိုေရႊ႕လိုက္ပါ
  6. iDevice ေပၚကေန iFile ကို Run လိုက္ပါ ၊ ေစာေစာက Folder ကို ရွာျပီးဖြင့္လိုက္ပါ။ ဥပမာ : var/mobile/Documents
  7.  (.deb) file ကိုေရြးျပီး and  install ကို Select လုပ္ပါ။
  8. YOU ARE DONE
TIP :  SSH လို႔မရဘူးဆိုရင္ေတာ့
>> Install OpenSSH from Cydia, reboot, အစက ျပန္လုပ္ၾကည့္ပါ>> ဒီလိုပဲထပ္ျဖစ္ေနရင္>>Cydia ထဲက afc2add ကို Install ျပီး reboot လိုက္ပါ။


နည္းလမ္း (၃): Mobile Terminal နဲ႕သြင္းနည္း

လိုအပ္ေသာ Software: Mobile Terminal ႏွင့္ OpenSSH (Cydia ကေန သြင္းရမွာပါ)

“Steps 2 and 3 ဟာ ဒီနည္းနဲ႔ သြင္းတဲ့ ပထမဆံုးတစ္ေခါက္မွာပဲလိုအပ္မွာျဖစ္ပါတယ္”
  1. မိမိသြင္းလိုတဲ့ (.deb) file ေတြကို desktop ေပၚကို Down လိုက္ပါ (ဥပမာ LockInfo)
  2. Cydia ကိုဖြင့္ပါ, “Search” ကိုသြားပါ, “Mobile Terminal” ဆိုျပီးရွာပါ၊ေတြ႔ရင္  install လုပ္ပါ။
  3. Cydia ကိုဖြင့္ပါ, “Search” ကိုသြားပါ, “OpenSSH” ဆိုျပီးရွာပါ၊ေတြ႔ရင္  install လုပ္ပါ။
  4. “MobileTerminal” ကိုဖြင့္လိုက္ပါ
  5. ေအာက္က commands ေတြကိုရိုက္ျပီး reboot လုပ္ပါ။:
su  ( return ကိုႏွိပ္ပါ )
alpine  (return ကိုႏွိပ္ပါ )
dpkg -i nameofpackage.deb  ( return ကိုႏွိပ္ပါ ), မ်ဥ္းသားထားတဲ့ nameofpackage ဆိုတဲ့ေနရာကို မိမိလိုခ်င္ရာေျပာင္းလိုက္ပါ ဥပမာ : LockInfo

မူရင္ လင့္က ဒီမွာ ပါ။

Wednesday, February 27, 2013

How to Make Myanmar Blog

ဒီကို သြားလိုက္ပါခင္ဗ်

Blog လုပ္နည္းစာအုပ္

Tuesday, February 26, 2013

U9200E/ U8836/(G500)/ U9200*B124/ S3/ T8830 တို႔ကို one click root လုပ္နည္း

ဒါေလးကိုအရင္ေဒါင္းလိုက္ပါ.  


Zip ဖုိင္ထဲမွာ ပါလာတဲ့ RunMe.bat ဖုိင္ေလးကို Run ၿပီးတာနဲ႔ ခဏေနရင္ ဖုန္းမွာ Restore လုပ္ခုိင္းတဲ့ Screen ေပၚလာမွာ ျဖစ္ၿပီး Restore my Phone ႏွိပ္ေပးလိုက္ရင္ Restart က်သြားပါမယ္။ ျပန္တက္လာရင္ Software ေတြ သြင္းတာကို ျပၿပီး ခဏေနရင္ ျပန္က်သြားပါလိမ့္မယ္။

ဒီဆိုဒ္ ကေန ကူးယူမွတ္သားထားပါသည္။
(U9200E P1 XL အတြက္ရွာရင္နဲ႕ သူကို root လုပ္တာက G500(U8836) နဲ႕ အတူတူဆိုတာသိလိုက္ရတယ္ခင္ဗ် S3/ T8830 တို႔ကိုလည္း ဒါနဲ႕သံုးလို႔ရတယ္လို႔ဆိုထားတယ္ခင္ဗ်)

မလုိခ်င္ေသာ Mail မ်ား ထပ္ဝင္မလာေအာင္

အဆင့္(၁) ကြ်န္ေတာ္တုိ႔အရင္ဆုံး မဝင္ခ်င္ေသာေမးလ္ကိုဖြင့္လုိက္ပါ။ ဖြင္႔ျပီျပီဆုိရင္ ေပၚဘက္နားေလးက More ဆုိတာေလးကို ကလစ္ေပးျပီးေတာ႔  Filter message like these ဆုိတာကုိ ကလစ္ေပးပါ။


အဆင့္(၂) အဲဒါျပီးရင္ ေနာက္ထပ္ Create filter with this search>> ဆုိတာကိုကလစ္ေပးပါ။

အဆင့္(၃) ေနာက္တစ္ခုမွာ Delete it နဲ႔ Also apply filter to 2 matching conversions ဆုိတာမွာ အစက္ကေလးထည္႔ျပီးေတာ႔ Create Filter ကုိ ကလစ္ေပးလုိ္က္ပါ။ ဒါဆုိရင္ျပီးပါျပီ။
မွတ္ခ်က္။ Also apply filter to 2 matching conversions မွာ က ႏွစ္ခုျဖစ္ႏုိင္သလို အမ်ားၾကီးျဖစ္ႏုိင္ပါတယ္။
အဆင္ေျပၾကပါေစ......
---mhuthaw.blogspot.com

restore point ေလးတစ္ခုဖန္တီးၾကရေအာင္

my computer ကို right click ျပီး properties ကိုေရြးပါ။
ျပီးရင္ဘယ္ဘက္ျခမ္းအေပၚနားက advanced system setting ကိုသြားပါ။
system properties box တစ္ခုက်လာပါလိမ္႔မယ္။
system protection tap ကိုေရြးပါ။
ျပီးရင္ေအာက္နားက create bottom ကိုႏွိပ္ပါ။
restore point လုပ္ဖို႔ နာမည္တစ္ခုေပးပါ။။အေကာင္းဆံုးကေတာ႔ကိုယ္လုပ္တဲ႕ရက္စြဲသာတပ္ပါ။
ျပီးရင္ create ကိုႏွိပ္ပါ။အလိုအေလ်ာက္ restore လုပ္သြားပါလိမ္႔မယ္။
တစ္ခ်ိန္ခ်ိန္ေရာက္လို႔ကိုယ္႕ကြန္ပ်ဴတာမွာျပသနာတစ္ခုခုၾကံဳလာခဲ႔ရင္ အထက္မွာျပခဲ႔တဲ႔အတိုင္း system protection tap အထိေရာက္ေအာင္သြားပါ။ျပီးရင္ system restore ကိုႏွိပ္ပါ။ ေရြးခ်ယ္ခိုင္းခဲ႔တယ္ဆိုရင္ ကိုယ္႔ဘာသာ႕ကိုေရြးမယ္
ဆိုတဲ႔ ေအာက္နားက စာေၾကာင္းေရွ႔မွာ အမွတ္တပ္ပါ။ျပီးရင္ဆက္လုပ္သြားပါ။ကိုယ္တစ္ခ်ိန္ကသတ္မွတ္ထားတဲ႔ေနရာကိုျပန္ေရာက္သြားပါျပီ။

Gtalk ကို တျပိုင္တည္း အမ်ားႀကီးဖြင္႔ၾကမယ္

Gtalk ကိုတခုထက္မက အမ်ားႀကီးဖြင္႔ထားရန္ ေအာက္ပါပံုတြင္ျပထားသည္႔အတိုင္း destop ေပၚရွိ Gtalk iconေလးကို
right clickေခါက္ၿပီး propertiesထဲ၀င္ထားပါ


ေအာက္ပါပံုတြင္ အျပာေရာင္ ျဖင္႔ select လုပ္ျပထားေသာ startmenu ကိုဖ်က္လိုက္ပါ


ေအာက္ပါပံုတြင္ ျပထားသည္႔အတိုင္း ခုနကဖ်က္လိုက္ေသာ startmenu ေနရာကို nomutexဟု အစားထိုးျပင္ေရးလိုက္ပါ


ၿပီးလွ်င္ apply ႏွင္႔ okႏွိပ္လိုက္ပါေတာ႔ အဆင္ေျပမွာ ပါ desstop ေပၚက gtalk iconကို ကလစ္ၿပီး ကိုဖြင္႔ခ်င္သေလာက္အမ်ားႀကီးဖြင္႔လို႔ရပါၿပီ

ေရြွျမို့ေတာ္ဖိုရမ္ မွ ကူးယူမွတ္သားထာပါသည္

How to Create a Filter in Gmail

1. Enter your Gmail log in information.


2.Click the "Create a Filter" link, located next to the Gmail search bar.


3. nter the search criteria that you would like to apply to the filter.


4.After entering your desired filter information, click the "Next Step" button.


5.Choose the appropriate boxes and save your new filter.


iPhone ထဲ သီခ်င္း ဓာတ္ပုံ ဗီြဒီယိုဖိုင္ေတြ အလြယ္တကူ ထည္႔နည္း

သီခ်င္း ဓာတ္ပုံ ဗြီဒီယို ဖုိင္ေတြကို iPhoneထဲကို အလြယ္တကူ ထည္႔နည္ေလးပါ။ မသိေသးသူမ်ားကို အထူးရည္ရြယ္ပါတယ္။ ေဒါင္းလြတ္လုပ္ရတာလည္း ဖုိင္ဆိုက္က အရမ္းေသးလို႔ ကုိယ္႔ရဲ႕ စက္မွာလည္း ဖုိင္ၾကီးၾကီးမ်ားမ်ား တုိးမသြားပါဘူး။ ေအာက္က ပုံေတြကို ၾကည္႔ရင္ သုံးရတာ လြယ္ကူတယ္ဆုိတာ သိသြားပါလိိမ္႔မယ္။ 

၁။ iTools ကုိ Download လုပ္ပါ။

၂။ ဖုံးကို ကြန္ပ်ဴတာနဲ႔ခ်ိတ္ပါ။ ခ်ိတ္ျပီးျပီဆိုရင္ ပုံထဲကလို iTools မ်က္နွာျပင္မွာ အခုလိုေတြ႔ရပါမယ္။ မိမိဖုံးရဲ႕ အေသးစိတ္အခ်က္လက္ကုိ ျမင္ေတြ႔ရမွာျဖစ္ပါတယ္။ က်ေနာ္ဖုံးကို စကၤာပူမွာ ၀ယ္ထားတာျဖစ္လုိ႔ Region မွာ စကၤာပူလုိ႔ ေပၚေနတာျဖစ္ပါတယ္။ ေနာက္ျပီး Jailbreak လုပ္ထားလုိ႔  Yes လုိ႔ ေပၚတာျဖစ္ပါတယ္။ တကယ္လုိ႔ သင္႔ဖုံးက Jailbreak လုပ္မထားရင္ေတာ႔ Jailbreak ေနရာမွာ No လို႔ ျပမွာျဖစ္ပါတယ္။ ေနာက္ျပီး ဖုံးရဲ႕ သက္တမ္း Warranty Exp ကိုလည္း ေတြ႔ရမွာျဖစ္ပါတယ္။ က်ေနာ္႔ဖုံးသက္တမ္းက သိမ္႔မက်န္ေတာ႔ပါဘူး။
၃။ iPhone ထဲမွာ မိမိၾကိဳက္ႏွစ္သက္တဲ႔ Ipa App မ်ားကို ဖုံးထဲမွာ Install လုပ္မယ္ဆုိရင္ေတာ႔ သင္႔ဖုံးနာမည္ေအာက္က Menu ဘားက Application ကုိ ႏွိပ္ျပီး အေပၚနား Install ေနာက္က အနီေရာင္စက္၀ိုင္းျပထားတဲ႔ ေအာက္ဆုိက္ျမွားေလးကို ကလစ္ျပီး သင္ Install လုပ္ခ်င္တဲ႔ Ipa App ကုိ ေရြးျပီး သင္႔ဖုံးထဲကို Install လုပ္ႏုိင္ပါတယ္။ 
၄။ ဒီတခါ ဖုံးထဲကို သီခ်င္း ထည္႔နည္းျဖစ္ပါတယ္။ ေအာက္ကပုံထဲကလုိ Menu ဘားက Media ကို ကလစ္ျပီး အေပၚနား အနီေရာင္ျပထားတဲ႔ေနရာက ေအာက္ဆိုက္ျမွား Import ကို ကလစ္ျပီး သီခ်င္း ရွိတဲ႔ေနရာကိုေရြးျပီး ထည္႔ႏုိင္ပါတယ္။ သီခ်င္းထည္႔တဲ႔အခါ ညာဘက္ေဘးနားက Playslists ကလစ္ေပး Create ဖိုင္ လုပ္ျပီး သင္ ၾကိဳက္တဲ႔သီခ်င္းမ်ားကို ဖုိင္တစ္ခုအေနနဲ႔ထားရွိႏုိင္ပါတယ္။ 
၅။ ဓာတ္ပုံမ်ားလည္း ဒီနည္းအတုိင္းျဖစ္ပါတယ္။
၅။ ဒါကေတာ႔ ဖုံး Desktop ပုံျဖစ္ပါတယ္။ သင္႔ဖုံးရဲ႕ Desktop ပုံကို ေတြ႔ျမင္ခ်င္တယ္ဆုိရင္ Menu ဘားကပဲ Desktop ကုိ ကလစ္ျပီး သင္႔ဖုံးရဲ႕ Desktop ကုိ ေတြ႔ျမင္ႏုိင္ပါတယ္။ ဒီပုံကေတာ႔ နမူနာအေနနဲ႔ ျပသျခင္းျဖစ္ပါတယ္။ 
က်န္တာကေတာ႔ သင္ စိတ္ကူးရွိရင္ ရွိသေလာက္ လုပ္ေဆာင္ႏုိင္ပါတယ္။ ဒီေလာက္္ဆိုရင္ သင္႔ iPhone ထဲကို အလြယ္တကူ သီခ်င္း ဓာတ္ပုံ ဗြီဒီယုိ စတဲ႔ iPhone မွာ ထည္႔လုိ႔ရႏုိင္တဲ႔ iTools အေၾကာင္း အျပည္႔စုံမဟုတ္ေတာင္ သိသင္႔တာ သိရျပီမို႔ သင္ကိုယ္တုိင္ ဖုံးထဲကို သီခ်င္း ဓာတ္ပုံဖုိင္မ်ားကို ထည္႔ႏုိင္မွာျဖစ္ပါတယ္။

မူရင္းဆိုဒ္ကေတာ့ ဒီမွာ ပါခင္ဗ်

USB StickထဲကData မ်ားကို ZawGyi Fonts ျဖင့္ Virus ဖ်က္ဆီးသည့္ရန္မွကာကြယ္နည္း

အခ်ိဳ႕ေသာ Virus မ်ားသည္ USB Stick ထဲသို႕၀င္ေရာက္ၿပီးတာနဲ႕ နဂိုမူရင္းရွိပီးသား Folder , Files
ေတြကို ေဖ်ာက္ပစ္ (Hidden) လုပ္ပစ္ကာ..ေဖ်ာက္ပစ္ျခင္းခံရေသာ Folder , Files တို႕ရဲ႕ နာမည္ဆင္
တူမ်ားကိုသာ ကြန္ပ်ဴတာအသံုးျပဳသူျမင္သာေအာင္ .exe အျဖစ္ေျပာင္းလဲၿပီး ျပထားတတ္ပါတယ္။

ကာကြယ္နည္းကေတာ့ အခုစေျပာပါေတာ့မယ္.. Folder ေတြ Files ေတြကို နာမည္ေပးရာမွာ English နာမည္ေတြခ်ည္းမေပးလိုက္ပါနဲ႕..ZawGyiFonts ေလးနဲ႕ နာမည္တြဲေပးပါ။ ဥပမာ New Folder လို႕ေပးမယ့္အစား "ေမာင့္New Folder" ဆိုျပီးေပးလိုက္ပါ ဒါဆို ဗိုင္းရပ္က အဲဒီဖိုဒါကို ဖ်က္လို့မရေတာ့ဘူး။

Saturday, February 23, 2013

Youtube ဗီဒီယို ေျဖာင့္ေျဖာင့္တန္းတန္း ၾကည့္နည္း

ဒီကို သြားလိုက္ပါ၊ ျပီးရင္
Join "Feather" Beta ဆုိတာေလးကို ႏွိပ္ယံုပါပဲ။ ျပီးရင္ ကိုယ္ၾကည့္ခ်င္တဲ့ Youtube က ဗီဒီယို၊ MTV ေတြကို ရွာျပီး ၾကည့္လိုက္ရံုပါပဲ။

Calendar Gadget in Windows Sidebar Is Blank With Orange Background

The Calendar gadget in the Windows Sidebar may display blank content, showing only the plain orange background. Also, the Stocks Gadget may not show up when you add it to the Sidebar. This problem is usually caused by a missing scripting run-time registration.

Registering VBScript.DLL

Registering the vbscript.dll file from an admin Command Prompt fixes the problem. Follow these steps:
1. Open an Admin Command Prompt window. To do so, click Start, click All Programs, click Accessories, right-click Command Prompt, and then click Run as Administrator.
2. Type the following command and press ENTER:
regsvr32.exe vbscript.dll
You should see the following message after running the command:
DllRegisterServer in vbscript.dll succeeded.

3. Restart Windows and see if the Calendar and Stocks Gadgets render correctly.

That doesn’t help? Fix the Zones Registry Key

Of late, we’ve seen several cases where an additional IE Security Zone registry key causing this problem. The additional security zone may have been added by a Malware, could appear as a pseudo-graphic number listed before zone number 0. The fix listed below is the same as the one documented in post Gadgets are Not Displayed Correctly in Windows 7 and Windows Vista.
Run the Fix-It Solution from Microsoft

[Windows 7 Users] Download the Fix it solution by clicking the image above, and run the executable. The problem should be taken care of, automatically.
To Fix the Problem Manually
1. Click Start, type Regedit.exe and press {ENTER}
2. Navigate to the following branch:
HKEY_CURRENT_USER \ Software \ Microsoft \ Windows \ CurrentVersion \ Internet Settings \ Zones

3. Under the Zones key, delete the subkey shown with an ASCII character, as in the above graphic.

4. Exit the Registry Editor.
5. Logoff and login back to your account.

Fix windows Gadget problesm

Desktop Gadgets Error ကိုေျဖရွင္းရန္


ကၽြန္ေတာ္ ဒီတစ္ခါ အမ်ားစု ေခါင္းရွဳပ္ၾကရတဲ႔ Error ေလးျဖစ္တဲ႔ Desktop Gadgets ေလးေတြ Error တက္တဲ႔ ျပႆနာေလးပါ။ သိၿပီးသားသူေတြကေတာ႔ သည္းခံေပးပါခင္ဗ်ာ။ ကၽြန္ေတာ္နည္းလမ္း ေလးေတြ ကိုေျပာေပးထားပါတယ္။ ကဲကၽြန္ေတာ္တို႔ စၿပီး ေျဖရွင္းၾကည္႔ရေအာင္ဗ်ာ။
ပထမဆံုးကၽြန္ေတာ္တို႔ Gadgets ေလးေတြကို Enable / Disable ေပးတဲ႔ နည္းကိုသံုးၿပီး ေျဖရွင္းၾကည္႔ပါမယ္။
ေအာက္မွာ ကၽြန္ေတာ္ Enable / Disable အတြက္ သတ္သတ္စီ ခြဲတင္ေပးထားပါတယ္။ ပထမဆံုး ကၽြန္ေတာ္ တို႔ Disable ေပးလိုက္ပါ။ သူရဲ႕ Reg ဖိုင္ေလးကို RUN ေပးရံုပါပဲ။ ၿပီးရင္ Enable ဆိုတဲ႔ Reg ဖိုင္ေလးကို ျပန္ RUN ေပးလုိက္ပါ။ ဒါကေတာ႔ ပထမတစ္နည္းပါ။ 
To Enable Gadgets

To Disable Gadgets
အခုေနာက္ထပ္တစ္နည္းကေတာ႔ Restore ျပန္လုပ္တဲ႔ နည္းေလးပါပဲ။ ကၽြန္ေတာ္ေအာက္မွာ ပံုေလးေတြ နဲ႔ျပေပးထားပါတယ္။ ရွင္းၾကည္႔လုိက္ပါ။
  
အခု Restore လုပ္တဲ႔နည္းနဲ႔ မရေသးဘူးဆိုပါေတာ႔ဗ်ာ။ ေနာက္ထပ္တစ္နည္းရွိပါေသးတယ္။ အခုက Gadgets ကို Restart ခ်ေပးတဲ႔ နည္းပါပဲ။ .Bat ဖိုင္ေလးနဲ႔တင္ေပးထားပါတယ္။ အဲ႔ဒီေကာင္ေလးကို Administrator နဲ႔ RUN ေပးလိုက္ပါ။ ဒီနည္းနဲ႔မွမရေသးရင္ ေနာက္ထပ္ ကၽြန္ေတာ္ CMD ထဲမွာရိုက္ထည္႔ ၿပီးေျဖရွင္းေပးရမယ္႔ နည္းကိုေရးေပးပါ႔မယ္။ ကၽြန္ေတာ္ ႏွစ္ေနရာခြဲတင္ေပးထားပါတယ္။

အခုေနာက္ထပ္တစ္နည္းကေတာ႔ Command Prompt ကို Right-click ေပးၿပီး Administrator နဲ႔ RUN ေပးလိုက္ပါ။ အဲ႔ဒီအထဲမွာရိုက္ထည္႔ရမယ္႔စာသားေတြကေတာ႔ေအာက္မွာေပးထားပါတယ္။
  • taskkill /im sidebar.exe /f
  • regsvr32 msxml3.dll
  • regsvr32 scrrun.dll
  • regsvr32 jscript.dll
  • regsvr32 atl.dll
  • Regsvr32 "%ProgramFiles%\Windows Sidebar\sbdrop.dll"
  • Regsvr32 "%ProgramFiles%\Windows Sidebar\wlsrvc.dll"
  • reg delete "HKEY_CURRENT_USER\Software\Microsoft\Windows\CurrentVersion\Internet Settings\Zones" /f
  • "%ProgramFiles%\Windows Sidebar\sidebar.exe"
  • မွန္ေအာင္ရိုက္ထည္႔ေပးဖို႔ေတာ႔လိုပါတယ္။ ၿပီးရင္ေတာ႔ စက္ကို Restart ခ်ေပးလုိက္ပါ။ ဒီေလာက္ဆိုရင္ အဆင္ေျပမယ္လို႔ထင္ပါတယ္။ အားလံုးပဲ Errors ေတြရန္ကေန ကင္းႏုိင္ၾကပါေစဗ်ာ။

    ေနမင္းေမာင္း ဆိုဒ္မွ ကူးယူမွတ္သားထားပါသည္ခင္ဗ်။

    Friday, February 22, 2013

    USB Transfer Size ကို 64 kb ကေန 2 MB အထိ ျမွင့္ျပီး

    ကၽြန္ေတာ္ အခုေျပာမဲ့ နည္းလမ္းေလးကေတာ့ ကၽြန္ေတာ္တို႔ ကြန္ပ်ဴတာမွာ USB Stick ကိုအသံုးျပဳျပီး File ေတြကို ကူးတဲ့ အခါမွာ အရင္ရွိျပီးသား  File Transfer value က 64 kb ပဲ ရွိပါတယ္ .. အဲ့ဒါကို ကၽြန္ေတာ္တို႔က 2 MB အထိျမွင့္ျပီး အသံုးျပဳမွာ ျဖစ္ပါတယ္ .. File Transfer value ျမွင့္လာေတာ့ မိမိတို႔ ကြန္ပ်ဴတာထဲကေန USB Stick ကို File ေတြကူးတာပဲျဖစ္ျဖစ္ USB Stick  ထဲကေန ကြန္ပ်ဴတာထဲကို File ေတြ ကူးတာပဲျဖစ္ျဖစ္ ပိုျပီးေတာ့ ျမန္ျမန္ဆန္ဆန္နဲ႔ ျပဳလုပ္ႏိုင္မွာ ျဖစ္ပါတယ္ .. ကၽြန္ေတာ္ ေအာက္မွာ ဘယ္လိုလုပ္ရမယ္ ဆိုတာကို ပံုေလးေတြနဲ႔ ျပေပးထားပါတယ္ ..

    အရင္ဆံုး Keyboard မွ Windows + R ကို ႏွိပ္ျပီး Run Box ကိုဖြင့္လိုက္ပါ .. ျပီးရင္ Run Box ထဲမွာ regedit လို႔ရိုက္ထည့္ျပီး OK ေပးလိုက္ပါ .. ဒါဆိုရင္ Registry Editor ပြင့္လာပါလိမ့္မယ္ ျပီးရင္ ‘HKEY_LOCAL_MACHINE \ SYSTEM \ CurrentControlSet \Controlusbstor  ထိအဆင့္ဆင့္သြားျပီး usbstor ကိုေရာက္ျပီ ဆိုရင္ 05AC12xx  ကိုကလစ္လိုက္ပါ .. ျပီးရင္ Edit ကိုသြားလိုက္ပါ ..  ျပီးရင္ ဆက္လုပ္ရမယ့္ အဆင့္ေလးေတြကိုေတာ့ ေအာက္မွာ ပံုေလးေတြနဲ႔ ျပေပးထားပါတယ္ ..
    ဒီေလာက္ဆိုရင္ေတာ့ USB Drive ကို  Transfer value ျမွင့္ျပီး အလြယ္တကူ အသံုးျပဳတက္ သြားမယ္လို႔ ထင္ပါတယ္ .. 
    အားလံုးပဲအဆင္ေျပၾကပါေစ ... ေက်းဇူးတင္ပါတယ္ခင္ဗ်ာ .. 

    ေနမင္းေမာင္ (နည္းပညာ) ဆိုဒ္မွ ကူးယူမွတ္သားထားပါသည္။

    hardware အေၾကာင္း သိေကာင္းစရာ

    ဒီကို သြားလိုက္ပါ

    video tutorials

    Monday, February 18, 2013

    Folder ကို run box ကေနေခၚရေအာင္

    > ကိုယ္လုပ္ခ်င္တဲ့ Folder ကိုသြား Copy လုပ္...
    > ပီးရင္ C မွာ Windows တင္ထားရင္ C: ထဲက Windows ထဲက System32 ( သိလိမ့္မည္လို႕ ေမွ်ာ္လင့္ပါသည္) :P
    > ကဲ ပီးရင္ Paste Shortcut ( Shortcut ) ေနာ္....
    > ပီးရင္ အဲ Shortcut Folder ကို ကိုယ္ၾကိဳက္တဲ့ Name ေပးေပါ့ ဥပမာ ( အတိုေကာက္ music ) ပီးရင္ 
     
    MyanmarITgroup မွ ကူးယူမွတ္သားပါသည္

    Thursday, February 14, 2013

    Root ျပီးသာ C8825 မ်ားတြင္ Time seting ခ်ိန္နည္း

    It is easy
    1) Turn off your Phone.
    2)Take out the SIM Card
    3) Set GMT+6:30 ( Your desire ) from Date and Time setting 4) Turn off Power again and Put the SIM Card
    5) Turn ON your Phone Good Luck! YN

    ေနာက္တစ္ခု သိလိုက္ရတာက Huawei ဖုန္းေတြမွာ root လုပ္လိုက္ရင္ တရုတ္စာေတြေပ်ာက္သြားတဲ့အတြက္ reset ခ်လိုက္ရင္ စာေတြေပ်ာက္သြားျပီး icon ေတြဘဲေပၚေနရင္ ဘာသာမွာ English ကိုေရြးေပးမွ စာေတြျပန္ျမင္ရလိမ့္မယ္။

    Tuesday, February 5, 2013

    စိတ္အားငယ္တဲ့အခါ............

    (၁) သာယာခ်ဳိျမတဲ့ မက္ေဆ့ေလးေတြရရင္ ဖတ္ပါ၊ ၿပံဳးပါ ၿပီးေတာ့ဖ်က္ပစ္ပါ။

    (၂) စိတ္တိုေဒါသထြက္ၿပီဆိုရင္ ၁ ကေန ၃ဝ အထိေရပါ ၿပီးမွ စကားေျပာပါ။

    (၃) ကိုယ္ႀကိဳက္ႏွစ္သက္တဲ့အရာကို ကိုယ္တိုင္ဝယ္ႏိုင္ေအာင္ ႀကိဳးစားပါ။ တျခားသူေပးမွာကို မေမွ်ာ္ပါနဲ႔။

    (၄) သစ္သီးရည္နည္းနည္းေသာက္ပါ အသီးမ်ားမ်ားစားပါ။ မုန္႔ပဲသေရစာနည္းနည္းစားပါ ေရမ်ားမ်ားေသာက္ပါ။
    နည္းနည္းထိုင္ပါ မ်ားမ်ားရပ္ပါ။ နည္းနည္းေတြးပါ မ်ားမ်ားၾကည့္ပါ။ နည္းနည္းေျပာပါ မ်ားမ်ားလုပ္ပါ။

    (၅) လူတစ္ေယာက္တည္းကို (၂၄)နာရီလံုးလံုး သတိရမေနပါနဲ႔၊ ေတြးေတာမေနပါနဲ႔။ သင့္အခ်ိန္ေတြကို သင့္မိသားစု၊ သင့္သူငယ္ခ်င္းေတြကိုလည္း ေဝမွ်ေပးပါ။

    (၆) ပိုက္ဆံရွိတဲ့ေယာက္်ားကိုရတာနဲ႔ အရာအားလံုးျပည့္စံုသြားမယ္ မထင္နဲ႔။ ေလာကမွာ ငယ္ရြယ္ႏုပ်ဳိတဲ့မိန္းကေလးေတြ မ်ားလြန္းပါတယ္။ စင္ေပၚတင္ထားတဲ့ ကိုကာကိုလာဗူးေတြလို ေသာက္ခ်င္တဲ့တစ္ဗူးကို သူတို႔ေကာက္ေသာက္သြားလိမ့္မယ္။

    (၇) အထီးက်န္ခ်ိန္ သီခ်င္းေဆြးေဆြးေတြ နားမေထာင္ပါနဲ႔။ ေန႔ရက္ေဟာင္းကို တမ္းတတာ ဒါမွမဟုတ္ အင္တာနက္ေပၚမွာပဲ ခ်ိတ္ေနတာမ်ဳိး မျဖစ္ေစနဲ႔။
    အားကစားထလုပ္ပါ ဒါမွမဟုတ္ သူငယ္ခ်င္းအေပါင္းအသင္းကို သြားရွာပါ။

    (၈) အလုပ္လုပ္ခ်ိန္ အာရံုစူးစိုက္ၿပီး အလုပ္လုပ္ပါ။ အားလပ္ခ်ိန္ လြတ္လြတ္လပ္လပ္ ေပါ့ေပါ့ပါးပါးေနပါ။

    (၉) ေနေရာက္ျခည္ကို ကာကြယ္သလို သင့္တင့္မွ်တတဲ့ ေနေရာင္ျခည္ပက္ျဖန္းမႈလည္း ရွိပါေစ။ ေနပူစာခံျခင္းနဲ႔ ညိႇဳးမႈိင္ေနတဲ့သင့္ခံစားခ်က္ကိ
    အလင္းေပးႏိုင္ပါတယ္။

    (၁ဝ) စာမ်ားမ်ားဖတ္ပါ။ အသိပညာနဲ႔ အရသာခံႏိုင္စြမ္းကို ျမင့္တင္ပါ။

    (၁၁) အျမင္ကဲြလဲြခြင့္၊ သေဘာမတူညီခြင့္ရွိႏိုင္ပါတယ္။ ဒါေပမယ့္ တစ္ဘက္သားကို ေလးစားပါ။

    (၁၂) ဖုန္းေျပာတဲ့အခ်ိန္မွာ ၿပံဳးၿပီးေျပာပါ။ တစ္ဘက္သားမျမင္ေပမယ့္ ခံစားႏိုင္ပါတယ္။

    (၁၃) ဘယ္သူ႔ေၾကာင့္၊ ဘယ္အရာေၾကာင့္ဆိုၿပီး ကိုယ့္ကိုယ္ကိုညႇင္းဆဲတာမ်ဳိး မလုပ္နဲ႔။ ဥပမာ- ထမင္းမစားတာ၊ အခန္းေအာင္တာ၊ ငိုယိုတာ၊ ကိုယ့္ကိုယ္ကို ထိခိုက္နာက်င္ေအာင္လုပ္တာ... ဒါေတြက လူတံုးလူအေတြမွ လုပ္တာပါ။

    (၁၄) အားလပ္ခ်ိန္မွာ ေရေႏြးၾကမ္းတစ္ခြက္ ေကာ္ဖီတစ္ခြက္ျဖစ္ျဖစ္ ဒါမွမဟုတ္ ကိုယ္ႏွစ္သက္တဲ့ အစားအစာေတြ ခ်က္ျပဳတ္စားတာပဲျဖစ္ျဖစ္ ကိုယ္ႏွစ္သက္တဲ့ သီခ်င္း၊ စာအုပ္တစ္အုပ္နဲ႔ျဖစ္ျဖစ္ ေနႏိုင္ပါတယ္။ ၿပီးေတာ့ ေန႔လယ္ေန႔ခင္း တေရးတေမာအိပ္ႏိုင္ပါတယ္။

    *** အင္တာနက္ေပၚဟိုတစ ဒီတစဖတ္မိတာကို ဘာသာျပန္မွ်ေဝပါတယ္
     
    Nine Nine Sanay @ ႏိုင္းႏိုင္းစေန မွကူးယူမွတ္သားထားပါသည္။
     

    iOS 6 to 6.1 ကုိ Untethered Jailbreak လုပ္နည္း


    iOS 6 to 6.1 ကုိ Untethered Jailbreak လုပ္နည္း (Tutorial) အေနနဲ႕တင္ေပးလုိက္ပါတယ္။ iOS 6 မွ 6.1 အထိ တင္ထားတဲ့ iPhone/Pad/Pod touch အားလုံးကုိ Untethered Jailbreak လုပ္နုိင္မွာျဖစ္ပါတယ္။
    အဆင့္ (၁) ။ ။ Jailbreak လုပ္ဖို႕အတြက္ လုိအပ္တဲ့ jailbreak tools ျဖစ္တဲ့ evasi0n jailbreak tool for windows ကိုေအာက္က link မွာရယူပါ။
    အဆင့္(၂)။ ။ download လုပ္လုိ႕ရလာတဲ့ ဇစ္ဖုိင္ထဲက evasi0n.exe file ကုိ run ပါ ။ user access control windows pops up ေပၚလာရင္ yes ခလုတ္ကုိႏွိပ္ပါ။.

    အဆင့္(၃)။ ။ မိမိတုိ႕ရဲ႕ iPhone/Pad/Pod touch မ်ားကုိ usb ၾကိဳးျဖင့္ ကြန္ပ်ဴတာနဲ႕ခ်ိတ္ဆက္ပါ။ iPhone/Pad/Pod touch ကုိ Passcode ေပးထားတယ္ဆုိရင္ျဖဳတ္ထားပါ။ Passcode ျဖဳတ္နည္းကေတာ့ Settings > General > Passcode Lock > ထဲကုိ၀င္ျပီး Turn Passcode Off လုပ္လုိက္ပါ။
    အဆင့္(၄)။ ။ iDevices ကုိကြန္ပ်ဴတာနဲ႕ခ်ိတ္ဆက္ထားတာကို Evasi0n ေဆာ့၀ဲကသိျပီဆုိရင္ Evasion ေဆာ့၀ဲထဲက Jailbreak ဆုိတဲ့ခလုတ္ေလးက မွိန္ေနရာကေန လင္းလာပါလိမ့္မယ္။
    အဆင့္ (၅) ။ ။ Jailbreak ျပဳလုပ္ဖုိ႕ရန္အတြက္ Jailbreak button ကုိႏွိပ္ပါ။
    အဆင့္ (၆) ။ ။ Evasi0n က မိမိရဲ႕ device ကုိစတင္ jailbreak လုပ္ပါလိမ့္မယ္။ မိနစ္အနည္းငယ္ခန္႕ၾကာပါမယ္။
    အဆင့္ (၇) ။ ။ iDevices မွာ Lock screen ျပန္ေပၚလာရင္ Slide toUnlock your device bar ကုိ slide လုပ္ပါ။ “Jailbreak” ဆုိတဲ့ နာမည္နဲ႕ icon ေလးကုိေတြ႕ရပါမယ္။ အဲဒီ Jailbreak app icon ေလးကုိတစ္ၾကိမ္ႏွိပ္ပါ (တစ္ၾကိမ္ပဲႏွိပ္ပါ)။ အဲဒီမွာ screen က ေခတၱ black screen ျဖစ္သြားျပီးျပန္တက္လာရင္ ခုနကလုိပဲ Jailbraeak နာမည္နဲ႕ icon ေလးကုိတစ္ၾကိမ္ပဲထပ္ႏွိပ္ပါ။
    အဆင့္ (၈)။ ။ Evasi0n က jailbreak data ေတြကုိဆက္လက္သြင္းပါလိမ့္မယ္။ အဲဒီအခ်ိန္မွာ iDevices ကုိတျခားဘာမွမလုပ္ပါနဲ႕။
    အဆင့္ (၉)။ ။ Jailbreak process ျပီးျပီဆုိရင္ “Done” ဆုိတဲ့ warning ျပပါလိမ့္မယ္။ iPhone/Pad/Pod touch ဟာ reboot ျဖစ္သြားပါမယ္။ reboot ႏွစ္ခါေလာက္က်ပါတယ္။ နည္းနည္းစိတ္ရွည္ေပးပါ။
    အဆင့္ (၁၀)။ ။ reboot လုပ္ရာကေန ျပန္တက္လာျပီဆုိရင္ေတာ့ evasi0n logo ကုိ screen ေပၚမွာအၾကီးၾကီးနဲ႕တက္လာမွာျဖစ္ပါတယ္။ တစ္ခါျပန္က်သြားျပီး ေနာက္တစ္ခါ evasi0m logo ျပန္တက္လာပါမယ္။ ျပီးရင္ Lock Screen အေနအထားကုိစတင္ေ၇ာက္ရွိသြားပါမယ္။ Slide to unlock bar ကုိ slide ဆြဲျပီး home screen ေပၚကုိ၀င္လုိက္ရင္ေတာ့ Cydia icon ကုိစတင္ျမင္၇ျပီျဖစ္ပါတယ္။
    ဂုဏ္ယူပါတယ္။ သင့္ရဲ႕ iOS 6 တင္ထားတဲ့ i device ကုိ evasi0n ေဆာ့၀ဲကုိအသုံးျပဳျပီး ေအာင္ျမင္စြာ jailbreak လုပ္နုိင္ခဲ့ျပီျဖစ္ပါတယ္။
    http://myanmarmobileapp.com/  မွကူးယူ မွတ္သားထာပါသည္။

    The iOS 6 / 6.1 untethered jailbreak has now become a reality, thanks to the hard work from those involved in the newly formed Evad3rs jailbreak team. The release of the new userland-based Evasi0n jailbreak tool means that users now have an extremely efficient way of making a complicated background process seem extremely simple.
    Supported devices:
    As mentioned in our previous post, Evasi0n supports all 20+ variants of iOS devices, including the likes of iPhone 5, on iOS 6.0 through iOS 6.1. Apple TV 3 though is not supported.
    Supported firmware versions:
    iOS 6.0, 6.0.1, 6.0.2, 6.1 are all supported.
    Requirements:
    • A computer running at least Windows XP or above, Mac OS X v10.5 or above, Linux
    • An iOS device running iOS 6.x
    • A USB cable for connection your iOS device to your computer.
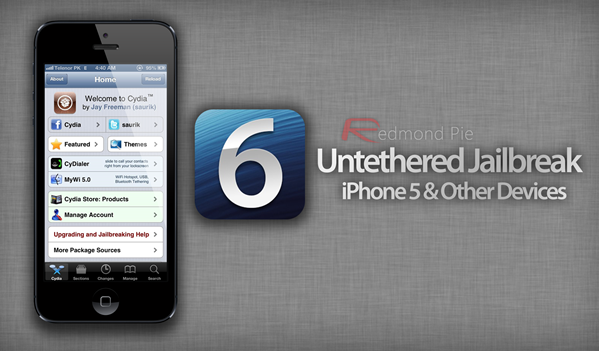
    iPhone 5 untethered
    How-to jailbreak iOS 6.1 (instructions):
    If you happen to be one of those who have been waiting extremely patiently for this jailbreak, then you’ve come to the right place. Follow our extremely simple step by step guide below to jailbreak your iOS device on iOS 6 / 6.1 fully untethered.
    NOTE:
    a. It is highly recommended to make a complete backup of your device using either iTunes or iCloud before proceeding with the steps below.
    b. If you happen to have followed our guide for older A4 based devices for tethered jailbreak iOS 6.1, the good news is that you can easily convert your tethered jailbreak into untethered by installing “evasi0n 6.x Untether” from Cydia.
    Step 1: Download Evasi0n jailbreak tool tailored for your OS (Windows / Mac / Linux).
    Step 2: Download iOS 6.1, and update your device to it using iTunes. Make sure you restore your device to 6.1 using iTunes, and not OTA, to avoid issues with jailbreak. Even though Evasi0n supports all versions of iOS 6, it is recommended to update to the latest 6.1 version before jailbreak so that you can get all the new features of iOS 6.1, with the added bonus of jailbreak.
    Step 3: Make sure you don’t have any passcode set on your device. You can disable Passcode lock from: Settings –> General –> Passcode Lock –> Off
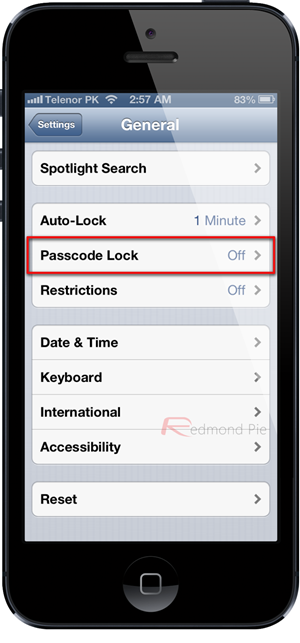
    Passcode lock
    Step 4: Make sure both iTunes and Xcode (if installed) are not running.
    Step 5: Start the Evasi0n jailbreak tool on your computer.
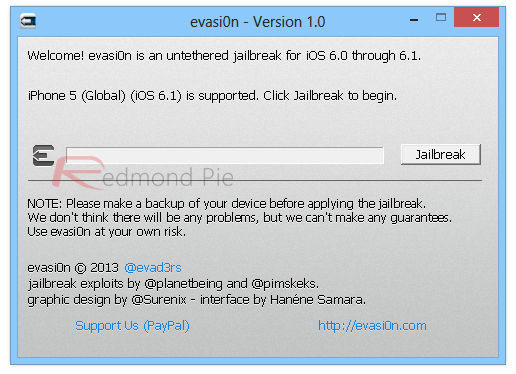
    Screenshot (27)
    Step 6: Connect the relevant iOS device to your PC or Mac via the 30-pin or Lightning cable (depending on the generation of the hardware). Make sure that the connected hardware is recognized by the jailbreak tool.
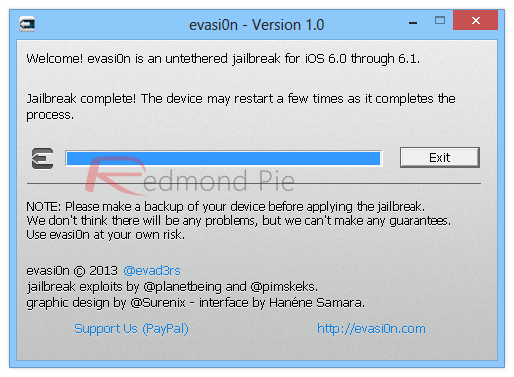
    Step 7: Select the Jailbreak option and relax as the software performs the necessary steps in the background to inject and run through the jailbreaking process.
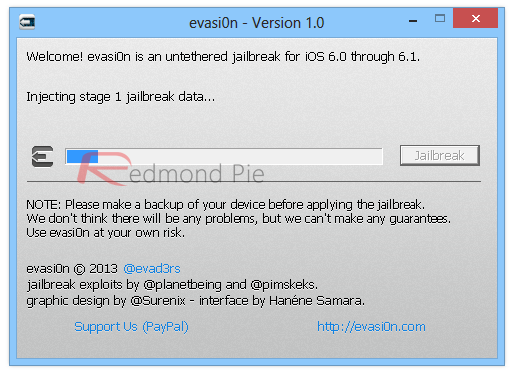
    Screenshot (28)
    Step 8: Be patient, do not touch your device or anything on computer during  jailbreaking process.
    Step 9: Once done, you will need to unlock your iOS Device, you will then see a “Jailbreak” app on the home screen. Tap on this icon, the screen will go black for a few seconds. After a short while, it will be back on the home screen.
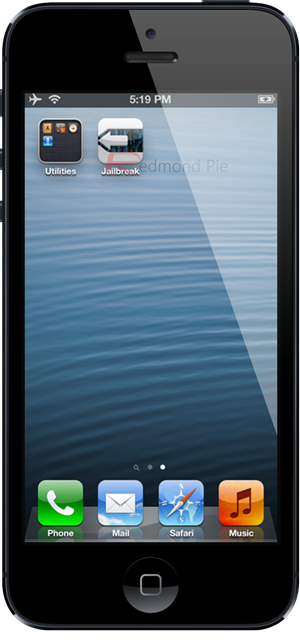
    download (3)
    Step 10: Rest of the process is automated, once the Evasi0n software on desktop says “Jailbreak complete!”, after a short while, your device will reboot several times to complete the process. Once this is done, you will have Cydia on the home screen.
    Screenshot (31)
    Running Cydia on iOS 6.1
    iPhone 5 jailbroken copy
    Start Cydia from the home screen of the device. Be aware that the first run of Cydia after a jailbreak will require the owner to choose what type of user they are (user, developer or hacker) as well as a run-through of some initial repository setup. Please be patient as this could take some time depending on server load.
    As always, remember that the release of any new jailbreak will always see an initial spike in activity at first release. The servers of Cydia and the stock repositories are expected to handle an unusually high load in the first few days, so expect some possible delays and frustrating moments when trying to load and refreshing data.

    root U9200

    Huawei Ascend P1 U9200 (Root + Unlock)

    Share This
    Tags
    Huawei Ascend P1 U9200 အတြက္ ကၽြန္ေတာ္ Firmware တင္ေပးလိုက္ေတာ့ Root နည္းလာေတာင္းၾကတဲ့ MMAS မိသားစု မ်ားအတြက္ အခုတစ္ခါမွာေတာ့
    U9200 ကို လြယ္လင့္တကူ Root ႏိုင္တဲ့ Tools ေလးကို တင္ေပးလုိက္ပါတယ္ အဆင့္ေလးေတြကိုလဲ ေျပာျပသြားမွာျဖစ္လုိ႔ အဆင္ေျပလြယ္ကူစြာ ျပဳလုပ္ႏုိင္ၾကမွာပါ။
    အရင္ဆံုး Unlock Bootloader Tools ေလးကို ေအာက္က Link မွာ အရင္ေဒါင္းလုိက္ပါ
    ကြန္ျပဳတာထဲကို ေဒါင္းလုပ္ဆြဲၿပီးရင္ Zip ေျဖလုိက္ပါ
    U9200 Root.exe ဆိုတာေလး ရလာပါမယ္ ကလစ္ႏွိပ္ၿပီး Run လုိက္ပါ
    ၿပီးရင္ေတာ့ ဖုန္းကို Unknown Sources အမွန္ျခစ္ေပးပါ
    USB Debugging ကိုလဲ အမွန္ျခစ္ေပးပါ
    ၿပီးရင္ ဖုန္းကို ကြန္ျပဳတာျဖင့္ စခ်ိတ္ပါ။
    Driver အားလံုးသိေနရပါမယ္…
    ခုဆိုရင္ေတာ့ စတင္ Root ပါေတာ့မယ္..
    အထက္ပါ ပံုအတိုင္း U9200 Root.exe Run ေနတဲ့ ပံုေလးပါ
    ၿပီးရင္ေတာ့ Root ဆိုတဲ့ Button ေလးကို ႏွိပ္ေပးပါ ဘာမွ လုပ္စရာမလိုပဲ
    သူ႔အလုိလို Root သြားပါလိမ့္မယ္…
    ျမန္မာေဖာင့္ထည့္တာနဲ႔ က်န္တာေတြကိုေတာ့ MMAS အဖြဲ႔၀င္မ်ား လုပ္တက္မယ္ထင္လုိ႔
    ထပ္မေရးေတာ့ပါဘူး။
    အဆင္ေျပလြယ္ကူစြာ Root ႏုိင္ၾကပါေစ..
    အခက္အခဲရွိခဲ့ရင္
    thitsankhant@gmail.com ကို ဆက္သြယ္ၿပီးေမးျမန္းႏုိင္ပါတယ္..

    MMAS မွကူးယူမွတ္သားထားပါသည္။