Showing posts with label ios. Show all posts
Showing posts with label ios. Show all posts
Friday, January 16, 2015

Thursday, July 10, 2014
Jailbreak လုပ္ျပီး deb ဖိုင္ေတြသြင္းျခင္း
၁။ souce ထဲကို cydia.myrepospace.com/komin27 ကိုadd ပါ။
၂။သက္ဆိုင္ရာ IOS နဲ႕ဆိုင္တဲ့ Appsync tweak ကိုအရင္ထည့္ပါ
၃။ IOS7 အထက္ဆိုရင္ေတာ့ afc2add ကိုထည့္ေပးပါ။
၄။ ကြန္ျပဴတာကေန iFun Box သံုးျပီးထည့္ပါ။
၂။သက္ဆိုင္ရာ IOS နဲ႕ဆိုင္တဲ့ Appsync tweak ကိုအရင္ထည့္ပါ
၃။ IOS7 အထက္ဆိုရင္ေတာ့ afc2add ကိုထည့္ေပးပါ။
၄။ ကြန္ျပဴတာကေန iFun Box သံုးျပီးထည့္ပါ။
Saturday, March 9, 2013
How to Save SHSH Blobs for iOS 6.1
How to Save SHSH Blobs for iOS 6.1
- Download TinyUmbrella;
- Run the downloaded TinyUmbrella file. It may take a few seconds to fully initialize;
- Connect your iPhone, iPad or iPod Touch that you want to save your SHSH blobs for. We suggest you to do this for all your iOS 6.1 compatible devices;
- Select your device from the left-pane, under connected devices, on Tinyumbrella;
- Now click on the Advanced tab, and uncheck the following two options:
- Save ALL Available SHSH
- Request SHSH From Cydia
- You can also change the save directory (under Advanced tab) to your desired one e.g. to your desktop, that way you can easily find, verify and backup SHSH blobs with TinyUmbrella;
- Now click on the Log tab where you’ll be able to see the status of your save attempt. Click the Save SHSH button, TinyUmbrella will attempt to save SHSH blobs for the latest firmware i.e. iOS 6.1 to the save directory you selected above. If saved successfully, the Log tab will contain a message saying SHSH SUCCESSFULLY SAVED;
- Now click on the General tab, the iOS 6.1 blobs should appear in the list.
That’s it! you’ve successfully save SHSH blobs for iOS 6.1 for your iPhone, iPad or iPod Touch
How To Unlock iPhone 4 or 3G/3GS with Ultrasn0w [iOS 4.0/4.0.1] Read more: http://www.callingallgeeks.org/how-to-unlock-iphone-4-or-3g3gs-with-ultrasn0w-ios-4-04-0-1/#ixzz2N7Ji8Ywj Under Creative Commons License: Attribution No Derivatives
he Jailbreak for iPhone 4 and all other iPhones running iOS 4 has already been released online at Jailbreakme.com
by Comex in a way few had expected. Now following that here’s the
unlock solution for you all. Use your iPhone 3G/ 3GS/ 4 with any carrier
worldwide with this unlock.
This guide has actually been tested on the said devices and works like a charm. The unlock via Ultrasn0w will work on your iPhone 3G, iPhone 3GS and iPhone 4 with almost any baseband. However do make sure that your baseband is one of the following:
Go to Settings > General > About > Modem Firmware to get this info.
iPhone 3G / 3GS Basebands:
 Steps to follow:


 Make sure you have a working wifi or data connection before you click
on Confirm as Cydia will try to download the app. Once the process is
over the Reboot Device button will appear. Click on it and wait for your
iDevice to restart. And you’re done. While it restarts you may put in
any other sim card other than the carrier the phone was locked to. It
worked the first time for me and without any issues. The network search is pretty fast and takes around 15 seconds maximum to register network.
Make sure you have a working wifi or data connection before you click
on Confirm as Cydia will try to download the app. Once the process is
over the Reboot Device button will appear. Click on it and wait for your
iDevice to restart. And you’re done. While it restarts you may put in
any other sim card other than the carrier the phone was locked to. It
worked the first time for me and without any issues. The network search is pretty fast and takes around 15 seconds maximum to register network.
 Go ahead and unlock your iPhone. Let us know if you run into any issues. We might be able to lend a helping hand as always.
This guide has actually been tested on the said devices and works like a charm. The unlock via Ultrasn0w will work on your iPhone 3G, iPhone 3GS and iPhone 4 with almost any baseband. However do make sure that your baseband is one of the following:
Go to Settings > General > About > Modem Firmware to get this info.
iPhone 3G / 3GS Basebands:
- 04.26.08
- 05.11.07
- 05.12.01
- 05.13.04
- 01.59.00
- Launch Cydia
- Click on Manage tab
- Click on Sources. Click on the Repo that reads “repo666.ultrasn0w.com”. If its not present click on Edit and then Add. Type the URL without quotes.
- Click on Ultrasn0w and then on the Install button.
- Finally, Click on Confirm
How to Chack iPhone models
Be sure you have the latest version of iTunes software. To check your iTunes version on a Mac, choose iTunes > Check for Updates. In Windows, choose Help > Check for Updates.
To ensure that your Mac or PC is compatible with your iPhone, check the system requirements for your model.
To ensure that your Mac or PC is compatible with your iPhone, check the system requirements for your model.
| Icon | Model | Year Introduced | Model Number* | Capacity |
 |
iPhone 5 (GSM model) | 2012 | A1428 | 16, 32, and 64 GB |
|
iPhone 5 (GSM and CDMA models) | 2012 | A1429 | 16, 32, and 64 GB |
|
iPhone 5 (CDMA China) | 2012 | A1442 | 16, 32, and 64 GB |
 |
iPhone 4S | 2011 | A1387 | 16, 32, and 64 GB |
|
iPhone 4S (GSM China) | 2011 | A1431 | 16, 32, and 64 GB |
 |
iPhone 4 (CDMA model) | 2011 | A1349 | 8, 16 and 32 GB |
 |
iPhone 4 (GSM model) | 2010 | A1332 | 8, 16 and 32 GB |
 |
iPhone 3GS (China) | 2009 | A1325 | 8, 16 and 32 GB |
|
iPhone 3GS | 2009 | A1303 | 8, 16 and 32 GB |
 |
iPhone 3G (China) | 2009 | A1324 | 8 and 16 GB |
|
iPhone 3G | 2008 | A1241 | 8 and 16 GB |
 |
iPhone | 2007 | A1203 | 4, 8, and 16 GB |
| * You can find the model number on the iPhone's back case. | ||||
Friday, March 8, 2013
How to crack your iPhone apps
step 1: Download and install Crackulous (Go to Download deb)
Step 2: Crack some stuff
Cracking apps with Crackulous is way too easy. When you open up Crackulous, you are shown a list of all of the apps that you have downloaded from the App Store. Just tap on any of them, and Crackulous will instantly crack them. Woooo.
Step 3: Use iFunbox to move your cracked apps off your device
iFunbox is an application that lets you browse the main file system of your iPhone. You need to use a program like iFunbox to get your .ipa files off your iPhone, and onto your desktop computer. If you have a Mac, you can use a program like iPhone Explorer.
Open iFunbox. You will see your iPhone listed on the left panel of iFunbox. Click on your iPhone’s listing, and open the raw file system.
Navigate your way to ‘var/root/Documents/Cracked’. This is where Crackulous stores all of your cracked app files. If you are using AppCrackr instead of Crackulous
Copy the files in ‘var/root/Documents/Cracked’ from iFunbox onto your computer. I like to drag-and-drop files to move them, though iFunbox has a built in “Copy to PC” feature if you want to use it.
Step 2: Crack some stuff
Cracking apps with Crackulous is way too easy. When you open up Crackulous, you are shown a list of all of the apps that you have downloaded from the App Store. Just tap on any of them, and Crackulous will instantly crack them. Woooo.
Step 3: Use iFunbox to move your cracked apps off your device
iFunbox is an application that lets you browse the main file system of your iPhone. You need to use a program like iFunbox to get your .ipa files off your iPhone, and onto your desktop computer. If you have a Mac, you can use a program like iPhone Explorer.
ifun box =>> iFunBox V1.7.747.603 is released
i Explorer=>> [ i Explorer ] manage iphone,ipod,ipad touch data without itunes
When you first download iFunbox, you get a ZIP file. The iFunbox program is stored inside the ZIP; just double click the ZIP file and move iFunbox out. You don’t need to install anything. (Why they decided to use a ZIP file, I have no idea). To use iFunbox, you must connect your iPhone to your computer with the USB cable that you normally use for syncing with iTunes.
i Explorer=>> [ i Explorer ] manage iphone,ipod,ipad touch data without itunes
When you first download iFunbox, you get a ZIP file. The iFunbox program is stored inside the ZIP; just double click the ZIP file and move iFunbox out. You don’t need to install anything. (Why they decided to use a ZIP file, I have no idea). To use iFunbox, you must connect your iPhone to your computer with the USB cable that you normally use for syncing with iTunes.
Open iFunbox. You will see your iPhone listed on the left panel of iFunbox. Click on your iPhone’s listing, and open the raw file system.
Navigate your way to ‘var/root/Documents/Cracked’. This is where Crackulous stores all of your cracked app files. If you are using AppCrackr instead of Crackulous
Copy the files in ‘var/root/Documents/Cracked’ from iFunbox onto your computer. I like to drag-and-drop files to move them, though iFunbox has a built in “Copy to PC” feature if you want to use it.
How to Backup Cydia Tweaks and Apps to .deb Packages on your Computer
Something bad happens to your iPhone, iPad or iPod touch and you’re forced to restore your firmware. You re-jailbreak,
restore your apps through iTunes but all your Cydia tweaks are gone and
you now start searching for them one after the other, installing them
from Cydia and even forgetting to install some important ones. The worst
scenario is when you forget the name of that tweak you had before
restoring your iDevice. If only Cydia tweaks could be synchronized with
iTunes… but we both know this is not possible for now. However I came
across a Cydia application that does this perfectly and it works quite
great. All my installed Cydia tweaks and applications were backed up and
copied to my computer.
To do this, you need a Cydia application called BackToDeb and also iFunbox.
Download BackToDeb (Cydia package)
Download iFunbox (Windows & Mac)
- Extract .deb file in the zip file your downloaded
- Connect your iPod / iPad / iPhone to your computer
-Install and run iFunbox and click on Cydia App Install

- Select Copy from PC and choose the .deb file I attached
- Detach your phone from the coputer
- Turn off your phone and turn it back on. You should have a new app on your springboard named BackToDeb
 - Click Backup packages
 - This may take a while depending on the size of your Cydia tweaks
and apps. You should be notified after it’s done as shown below:
- This may take a while depending on the size of your Cydia tweaks
and apps. You should be notified after it’s done as shown below:

All your installed Cydia packages are now backed up on your device.
- Connect your phone to your computer and run iFunbox.
- Select Raw File System on iFunbox and navigate to this location: var > mobile > BackToBed.
- You should now see all your backed up Cydia packages.
- Press CTRL + A on your keyboard to select all the files.
- Click Copy To PC, select your desired location and save the .deb files.
- Run iFUnbox
- Select Cydia App Install
- Click Copy from PC and locate the .deb files
- Select them all, detach your phone and restart. I suggest your restart your device twice.
To do this, you need a Cydia application called BackToDeb and also iFunbox.
Download BackToDeb (Cydia package)
Download iFunbox (Windows & Mac)
How To Install BackToDeb
You can search Cydia for BackToDeb or download from the link above and SSH it to your device- Extract .deb file in the zip file your downloaded
- Connect your iPod / iPad / iPhone to your computer
-Install and run iFunbox and click on Cydia App Install
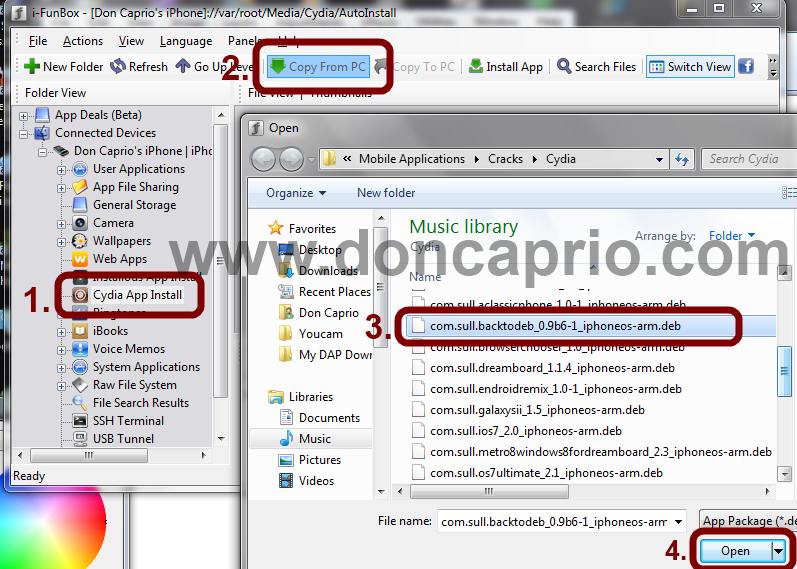
- Select Copy from PC and choose the .deb file I attached
- Detach your phone from the coputer
- Turn off your phone and turn it back on. You should have a new app on your springboard named BackToDeb
How to use BackToDeb
- Run BackToDeb and click Continua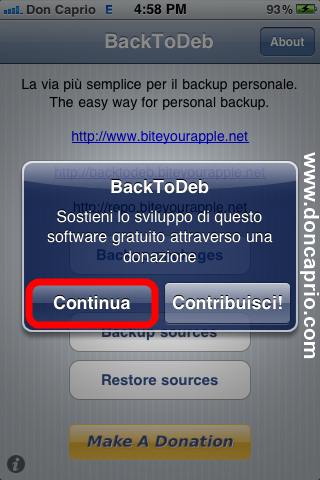

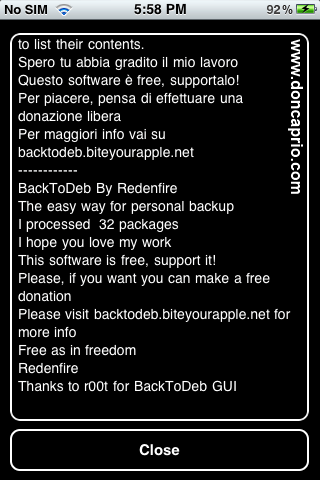
All your installed Cydia packages are now backed up on your device.
Copying the .deb Files to your Computer
The files are located in //var/mobile/BackToBed in your iDevice file system. To copy to your PC, follow these steps:- Connect your phone to your computer and run iFunbox.
- Select Raw File System on iFunbox and navigate to this location: var > mobile > BackToBed.
- You should now see all your backed up Cydia packages.
- Press CTRL + A on your keyboard to select all the files.
- Click Copy To PC, select your desired location and save the .deb files.
Restoring your .deb packages after a fresh firmware install & jailbreak
In the even that you restored you firmware and had to jailbreak your phone again, restoring your tweaks and apps without downloading them all over again from Cydia is very easy since you have them on your PC already.- Run iFUnbox
- Select Cydia App Install
- Click Copy from PC and locate the .deb files
- Select them all, detach your phone and restart. I suggest your restart your device twice.
How to Install .deb File [iPhone/iPod/iPad Cydia Tutorial]
1st Method: Install with iOS Safari Browser + iFile
Requirements: iPhone/iPod/iPad Safari Browser + iFile- Download .deb file with iPhone/iPod/iPad Safari browser
- Choose >> Open in “iFile”
- Once iFile opens >> Select Installer
- Respring
- YOU ARE DONE
2nd Method: Install with SSH Client + iFile
Requirements: SSH Client (iFunbox for Windows/Cyberduck for MacOS) + iFile- Download iFunbox >> (www.i-funbox.com) Windows , or Cyberduck for MacOS
- Download desired (.deb) file to your desktop
- Run iFunbox and connect your iOS (iPhone, iPod or iPad)
- iFunBox will show your device contents, Now navigate to any folder for example: var/mobile/Documents
- Move (.deb) file from your desktop to var/mobile/Documents
- Run iFile from your iOS, and navigate to the same folder i.e. var/mobile/Documents
- Click on (.deb) file and select install
- YOU ARE DONE
3rd Method: AutoInstallation Folder
Requirements: SSH Client (iFunbox for Windows/Cyberduck for MacOS)- Download iFunbox >> (www.i-funbox.com) Windows , or Cyberduck for MacOS
- Download desired (.deb) file to your desktop
- Run iFunbox and connect your iOS (iPhone, iPod or iPad)
- iFunBox will show your device contents, Now navigate to var/root/Media/
- Create the folder Cydia/AutoInstall (if not already created)
- Move (.deb) file from your desktop to var/root/Media/Cydia/AutoInstall
- Reboot your iOS
- YOU ARE DONE
4th Method: Install with Mobile Terminal
Requirements: Mobile Terminal + OpenSSH“Steps 2 and 3 are only if you have never installed a .deb file with this method”
- Download the .deb file you want (example : LockInfo)
- Start Cydia, go to “Search”, type “Mobile Terminal” and install it
- Repeat step 2 for “OpenSSH”
- Start “MobileTerminal”
- Type the following commands , then reboot:
How to add custom ringtones to your iPhone?
Easily add custom ringtones to your iPhone using iTunes.
The default ringtones that comes with the iPhone are pretty basic and blank. You can, instead, use your own piece of music as a ringtone on your iPhone. All you need to get this done is an iPhone, Connector Cable and iTunes.Follow these (simple) steps to add a custom ringtone to your iPhone,


Open the .mp3 file in iTunes. Right-click the .mp3 file and choose “Get Info“.

Once the Get Info dialog comes-up navigate to the Options tab. If you are using a short .mp3 file as your source then you might not want to touch any of the settings on this tab. But if you trying to extract a portion of the .mp3 file then you wanted to key-in values for the “Start Time” and “End Time” items. Keep in mind that the total length of the ringtone can only be less than 30 seconds.
How do you know the start and end times? Well, if you have Audacity installed then you should be able to grab the start and end time of your clip using Audacity’s trim feature.

Now we are ready to convert the file to a more friendly format that .mp3. Right-click on the same file again and choose the “Convert AAC Version” option.

If you don’t see the option on your right-click menu then go to iTunes > Preferences > General Tab and click on the “Import Settings…” button. Change the “Import Using” dropdown menu to “AAC Encoder“.

Once the file is converted to AAC version it generates a .m4a file. Drag the file to your Desktop (or any other location that you prefer).

Rename the .m4a file to .m4r file. If you have any questions on how to do it the safest way to do is to right-click the .m4a file and choosing the “Get Info” option.

On the dialog that comes up change the extension of the file to .m4r and confirm the rename.

Before you proceed any further you should remove the AAC version of the file that’s on your iTunes.

Now, move the .m4r file that’s on the desktop to the Ringtones folder on iTunes.

Now it’s all pretty much set for you to make use of the custom ringtone. Connect your iPhone and do a Sync.

Once successfully synced, tap on your iPhone Settings app.

Tap on the “Sounds” option.

Then tap on the “Ringtone” option.

iPhone will now display the list of available ringtones and you should be able to see the newly added ringtone at the top of the page under the “Custom” section. Tap on the ringtone name to choose the ringtone as your default iPhone ringtone.
That’s all to it to get a custom ringtone on your iPhone. It may look like a lot of steps involved but basically it’s pretty simple and if you focus a little bit you can get it right on your first attempt and then you’ll love having the ability to make your own custom ringtone for your iPhone.
I hope you find it useful. If you have any questions/comments regarding this please let me know in comments.
Subscribe to:
Posts (Atom)